
Introduction
This document aims to share information about transperineal prostate fusion biopsy under local anesthesia, with Koelis Trinity™ system.The following information relies on observations and advice from urologists such as:
- Dr Baco, from Aker University Hospital, Oslo, Norway.
- Dr Bott from Frimley Park Hospital, Camberley, United Kingdom.
- Dr Messas from American Hospital of Paris, France.
Moreover, some information is drawn from congress workshops, such as during AUA19: “Introduction to Office-Based Transperineal Prostate Intervention: MR/US Fusion biopsy” with Transperineal rationale (Chad Ellimootti, MD MS); Transperineal biopsy techniques (Arvin K. George, MD)
1. Materials check-list
The following tab summarizes the items used to perform transperineal prostate biopsies
Disposable products
| Material | Designation | Manufacturer | Reference | Function |
| Needle | Microlance 3 | BD | 300400 or 300800(1) | Subcutaneous anesthesia |
| Needle | Chiba | Temno | CHI2220 | Peri-prostatic anesthesia |
| Coaxial needle (2) | TruGuide | Bard | C1816A | Skin perforation before biopsy needle insertion |
| 20mL syringe | Luer-lok | BD | 300629 | Anesthetic injection |
| Biopsy-gun | Max-Core | Bard | MC1825 | Tissue harvesting |
| Probe protection with little elastic bands | PROcovers | CIVCO | 610-213 | Protection and lubrification |
| Sterile gel for ultrasound | 20mL | EDM Medical Imaging | PC020 | Lubrification and US transmission |
| Cupula / cups | 60mL, graduated | Asterie | 1729003A | Betadine container |
| Betadine | Skin disinfection | |||
| Waterproof table protection | Avoid table stain from betadine | |||
| Cotton balls | Perineal area disinfection | |||
| Biopsy pads | Samples biopsy storage | |||
| Anapathology pots | Sample conservation | |||
| Cassettes for samples | Storage | |||
| Large tape | Fix patient testicles | |||
| medical mob cap or sterile protection | Optional. Sterile manipulation of the mouse | |||
| Endoscope sterile drape | Camera drape (universal) | Premier Guard | 10-1112 | Optional. Sterile manipulation of Steady Pro® |
(1) Longest subcutaneous needle as possible.
(2) Koelis recommendation
Reusable products
| Material | Designation | Manufacturer | Reference | Function |
| Steady Pro® | Steady Pro® | Koelis | Probe holder | |
| Side-fire probe | 3D endocavity side-fire Probe | Koelis | K3DEL00 | Needle and organs visualization |
| Transperineal guide | Perine Grid® 18G or Perine full Grid® | Koelis | KRNG.EL1.18-5 or KRNG.EL4.18-5 | Guide the needle through perineum |
| Stirrups (boot shape) | Lift patient legs | |||
| Trolley | Sterile products preparation | |||
| Bin | Throw disposables component |
2. Preparation before patient arrival
Before the patient arrival, soak the probe into disinfection product. To see which disinfection solution is compatible with the probe, refer to KOELIS Trinity™ user manual. Import the patient MRI into Trinity™, but contouring can be done during the spare time when anesthetic take action
Steady Pro™
How to set Steady Pro™ well on the hospital bed? – Dr. MESSAS’s method
- Avoid conflict between Steady Pro™ attachment and those of stirrups on the bed rails.
- The rotation axis “notches” of the articulated arm must be oriented in order to take advantage of Steady Pro™ degree of freedom (the axis can be rotated when the black screw is fully unlocked).


How to set Steady Pro™ well on the hospital bed (Lateral position)? – Dr. BOTT’s method
When the patient is in decubitus lateral position (cf patient management) Steady Pro™ must be horizontally-oriented like below. You can use the “I” fixation of your Steady Pro™ to elevate the arm at rectum height


Probe holder
Find below further information about the different steps to set up and probe installation (dorsal decubitus only)
1- You can easily see if the external part is well locked as described below:


2- Check the probe holder alignment with the bed, from above. Find below further information about the different steps to set up and probe installation


3- Then check the horizontal alignment of the probe holder with the bed


KOELIS Advice
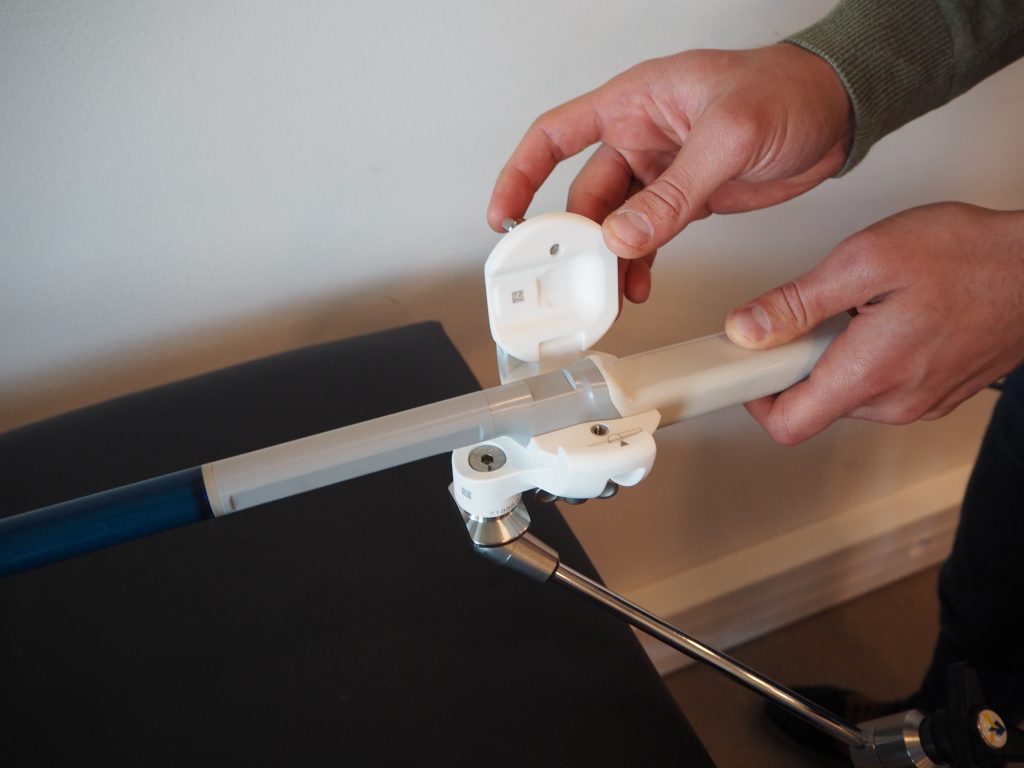
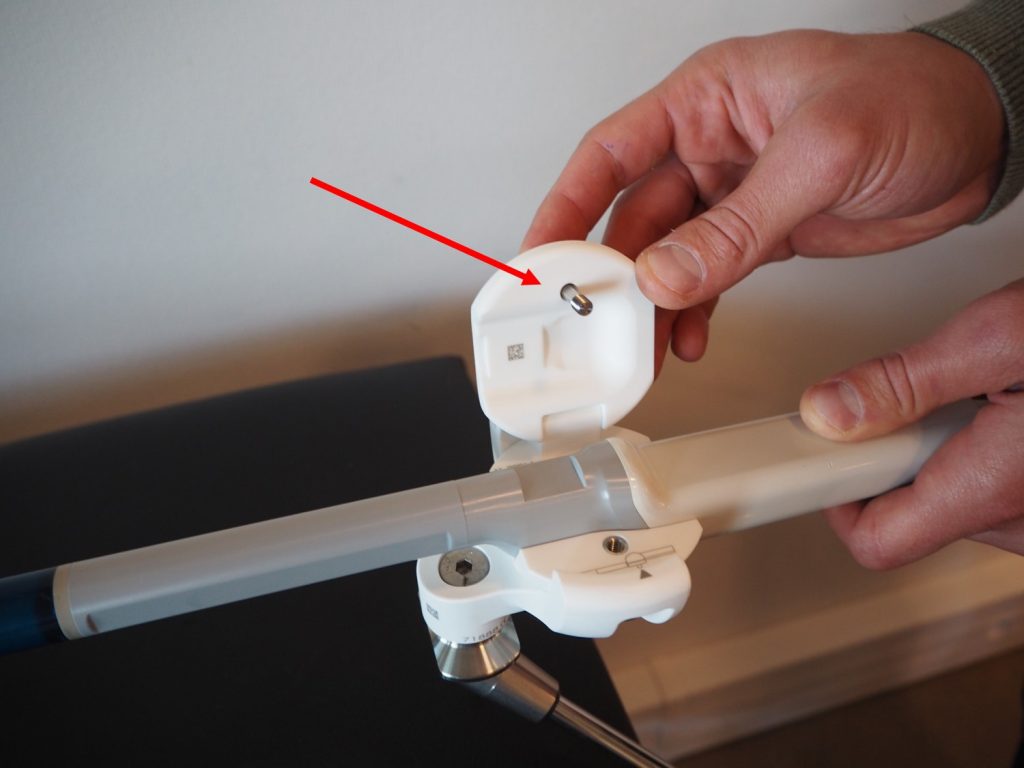
First, you have to assemble the probe holder (white parts). Position the internal piece so that Koelis logo is facing you. Note that the big screw linking the articulated arm and the holder is toward the patient. Two little arrows are facing each other (on the left) to confirm that the internal part is correctly positioned on the external one.

Keep in mind to not drop the holder white screw while sterile manipulation. The screw being upside down, screwing direction is reversed.
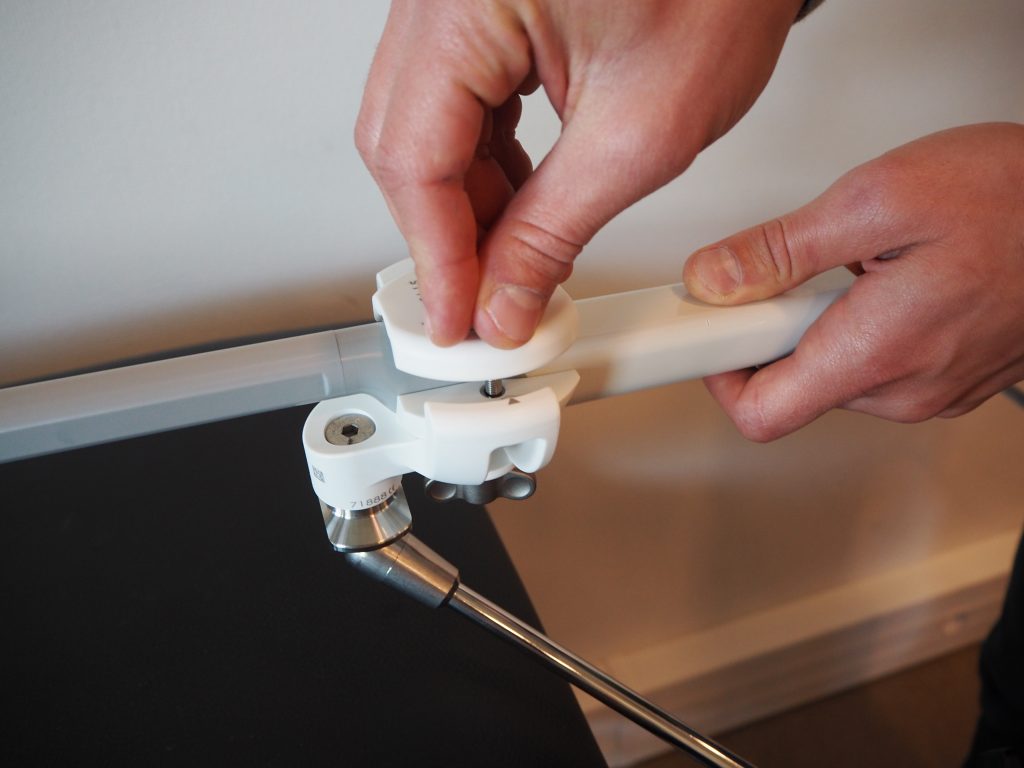
Secondly, take some time to train yourself at the assembly and locking of the probe holder Steady Pro™ articulated arm.
Find here a user manual reminder.
Probe Preparation
Put some ultrasound gel inside the protection before inserting the probe, to avoid air interface. The amount depends on the probe protection you will use:
- One drop is enough for large and thin protection
- More for classic protection
With the help of the nurse, the protection can be set on the probe in a complete sterile way (cf video “KOELIS’ product preparation by Dr. Messas” below). Moreover, you can add elastic bands to tighten and secure the protection. Add them from the head of the probe to the base, to avoid bubble creation. Unroll the protection until the base, to lock it in the probe holder.
Finally, you can unlock the Steady Pro™ black screw and move the probe on the side of the bed, in a security position to avoid any damages caused by the patient during his installation. Moreover, it is more comfortable for the patient to not see the probe, avoiding him to be anxious.
KOELIS Advice
Make sure to remove all the air bubbles between the probe and the protection: the probe head can be positioned toward the bottom and the doctor rubbed the protection toward the top (using sterile gloves).
Probe – Probe Holder Assembly
Put the probe inside the internal part of the probe holder and fully lock the screw n°1.
Then, check that after unlocking the screw n°2, the probe and the internal part of the probe holder can rotate inside the external one.

KOELIS Advice
While closing the upper part of the holder, it could be interesting to maintain the grey screw toward the inside of it, so that the screw orients perfectly towards the screw thread. (see pictures below). At this step, it could be interesting to grab the probe handle and the holder together with one hand (thumb on the handle, hand palm below the holder, white screw-locked, black screw fully unlocked), to keep the whole in the axis and adjust it if needed.
Disposable and reusable products preparation by Dr. Messas
Disposable and reusable products preparation by Dr. Bott
Anesthetic preparation
To prepare the anesthetic, use a sterile cup and pour:
- 40mL of xylocaine 1%
- 40mL of physiological saline
- 2mL of HCO3Na
You will now have access to more than 82mL of xylocaine 0.5% pH 7 to perform your anesthesia.
- Prepared by the nurse, the anesthetic solution is filled in two different syringes:
- 20mL of xylocaine 1% in cutaneous anesthesia syringe
- 20mL of xylocaine 1% in periprostatic anesthesia syringe
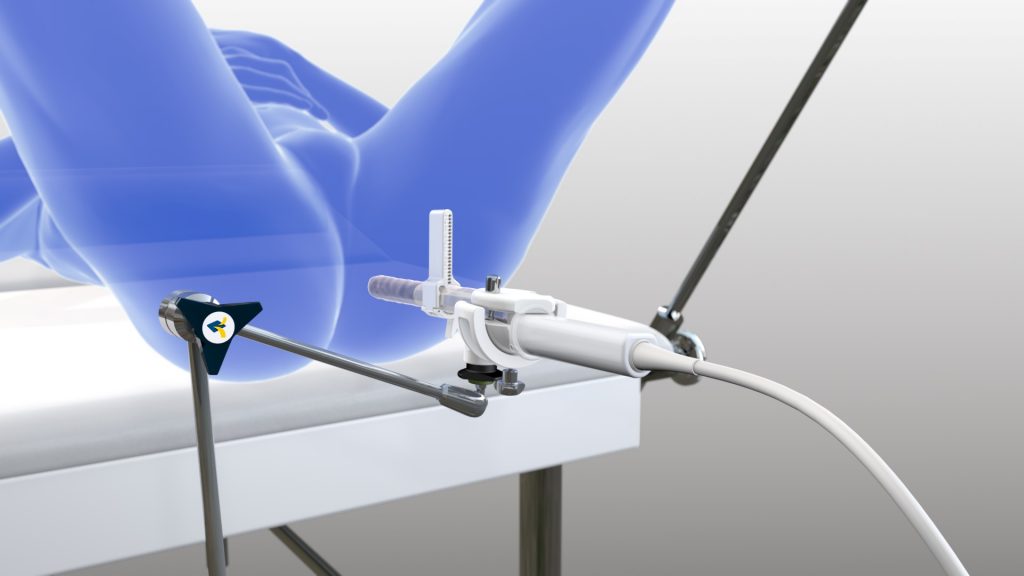
Example of room preparation
Office preparation:
- Trinity™ system
- Steady Pro™
- Ultrasound side-fire probe
- Stirrups
- Waterproof table protection
- Pillow
- Bin, moves between patient and surgeon during the exam, to throw disposables
- Surgeon seat

3. After patient arrival
Patient management
At the patient entry, follow the regular medical procedure control:
- Urine examination (ECBU)
- Rectal enema
- MRI
- EMLA cream
- prophylaxis
- Etc …
Then you can install the patient in the bed
Note that two patient positions are possible to perform transperineal biopsy under local anesthesia:
- The dorsal decubitus, also known as lithotomy position, is the most commonly used.
- The lateral decubitus, performed by few physicians in some medical centers, compatible with KOELIS Perine Grid™ 18G only.
For the dorsal decubitus: Dr. Messas & Dr. Baco method:
- Coccyx on the edge of the pillow
- Legs bent toward the head
It will show the best entry for the biopsy session by elevating the pubic symphysis.
The testicles management must be considered: you can use tape to tie them from the bottom to the top
Before any needle insertion, disinfect the skin area with betadine: From the top to the bottom, use several cotton balls to finally reach the anus. Disinfect the buttock area so that, during guide setting on the probe, you touch a skin covered of betadine.

Patient management by Dr. Messas
- For lateral decubitus: Dr. Bott method
- Buttock on the edge of the table
- Legs bent toward the head, with a pillow between the knees
- Testicles pulled in front of the patient
- Before any needle introduction, disinfect the skin with betadine, make sure to cover a wide area

Patient management by Dr. Bott
KOELIS Advice
You can consider shaving the perineum, to avoid hair introduction in the patient wound.
Anesthesia process
Cutaneous anesthesia
Dr. Messas method:
To perform the cutaneous anesthesia, use the BD Microlance 3 (ref : 300400 or 300800) and bend the needle at 45°.
Dr. Messas from Paris, France, describes a pattern in two steps:
- First, insert the needle on the median line, away from the rectum, and inject anesthetic in a large angle, on both side. Make sure to pull out the needle between every movements, to avoid patient pain.
- Then, add a second anesthetic injection, closer to the rectum, away from the medium line, to cover posterior and lateral sides of the prostate.
Again, make sure to pull out the needle between every movements.
Regarding amount of anesthetic, the cutaneous anesthesia uses around 20cc of xylocaine 0.5% pH 7.4.


Cutaneous anesthesia performed by Dr. Messas
Peri-prostatic anesthesia
Anesthesia targets the perineum deeper plane which contains a nervous plexus, responsible for its sensibility.
Before performing anesthesia, you have to prepare a 3D prostate exam for your patient, registered in Trinity™ system:
- Start the Trinity™ system
- Go to “Prostate cartography”
- Click on the patient name (if needed, create a new one)
- Go to “Mapping”
- Choose either:
- “Import” if you want to import MRI,
- “1st look” if images are already loaded
- “2nd look” if you want to perform new biopsies over previous 3D map.
- To improve ultrasound image quality and avoid any artifacts, add ultrasound gel on above the ultrasound active part of the probe (blue head) and then insert the probe into patient’s rectum
Ultrasound image is displayed on the right.
Depending on doctors, peri-prostatic anesthesia process can be described in several steps.
The two probe holder screws are locked when you insert the probe in the patient. Don’t use too much lubricant gel during probe insertion, it could contaminate the perineum by emerging from the rectum.
Evacuate gases between probe and the rectum. For this purpose, you can use the biopsy needle sheath to evacuate the compressed air in the rectum.
From this step, you have to use sterile gloves.
Thanks to the ultrasound image, you can estimate the prostate width and how many needle insertion you will perform (two or three per side) by unlocking the probe rotation with the screw below the probe holder.
Regarding amount of anesthetic, 60 mL of xylocaine 0.5% pH 7.4 remains for the peri-prostatic anesthesia.

When biopsies has to be performed on both sides of the prostate, it can be a challenge to decide how much dose you deliver in which spots. For wide prostates, we divide each side in 3 sectors and 30mL are distributed in these 3 sectors. For small prostates, 2 sectors are enough to cover the whole area.
Every needle insertion is performed following theses steps :
- Area visualization with ultrasound
- Identification of the anesthesia site : mostly posterior for the peripheral zone
- Choice of the needle height (on the guide)
- Needle insertion
- Anesthetic release from the insertion to the prostatic shelf
Insert the probe in the patient’s rectum and evacuate gases (between the probe and the rectum).
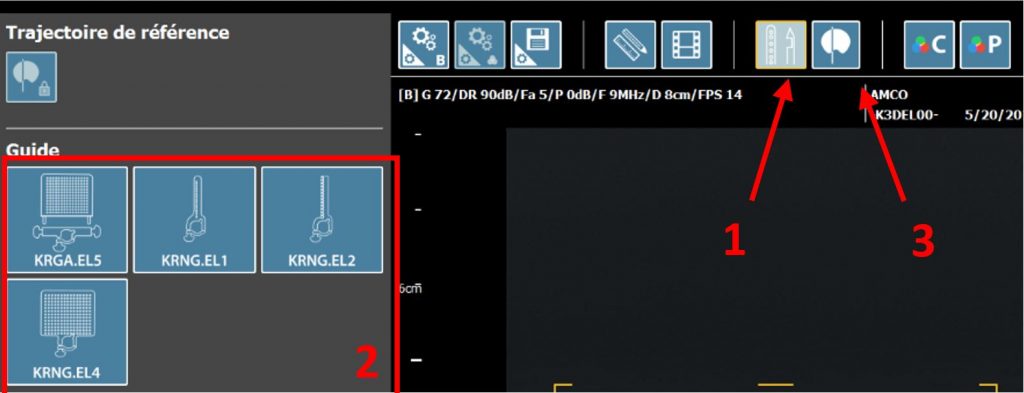
Set the Perine Grid® on the probe. Select the Perine Grid® you are using on Promap software (1-2) and display the needle path (3)
Dr Eduard Baco, from Aker University Hospital, Oslo, Norway recommend three-needle insertions:
Probe at 0°: Visualize the sphincter ani. Concerning Perine Grid® holes, “i” from Perine mini Grid® is usually used, or line “2” / “3” (middle column) from Perine full Grid®. Needle insertion (quick to avoid patient pain) is made in two steps: first at mid-length with release of a bit of solution, second at full length. The solution must invade recto-prostatic space and pull-up the gland. Inject the rest of solution while removing the needle.
Probe at -45°: Visualize the right levator ani (triangle shaped muscle). Concerning Perine Grid® holes, “G” or “i” from Perine mini

Grid® are usually used. Inject product in two times (mid-length and full length), and while removing the needle. Depending on the biopsylocation, it could require to inject solution in posterior or anterior areas of the levator ani. Few levator heights can be anesthetized, depending on specific cases.
Probe at +45°: Same process for left levator ani.
At the end, center the probe beam on the urethra to prepare the reference ultrasound volume acquisition

Make sure your probe is horizontally aligned with patient rectum before its insertion. The two probe holder screws are locked when you insert the probe in the patient. You can add further lubricant gel on the probe to make insertion easier.
Before starting periprostatic anesthesia :
-
- Start the panorama: acquire your reference 3D ultrasound volume.
- Check the whole gland is inside and confirm.
- Create the prostate contour on the software (follow each step displayed on the screen), adjust it to perfectly fit the patient gland and validate
- Set up Perine Grid® on your probe, close to the perineum.
You are now ready to perform the periprostatic anesthesia. Dr. Bott, from Frimley Park Hospital, describes his following method :
Probe centered on the prostate. Inject anesthetic during needle insertion, mostly posterior to the patient.
Then, use “Virtual biopsy” feature to help you place your guide so that it aims the middle of the target: move your probe, try a virtual biopsy, if it’s not aiming the target, repeat previous steps until it does.
When you perfectly aim the target, you can inject a solution at the correct heigh to anesthetize the whole area.
The anesthesia of the other side of the prostate will be done after targeted biopsies , previously to systematic biopsies . The prostate is anesthetized side by side.
Regarding the amount of anesthetic, around 5mL to 10mL are injected at each needle insertions, depending on the planned area to punction.
If systematic biopsies are very spaced, prefer re-inject a small amount of anesthetic in the area to be punctioned, to avoid patient pain
Peri-prostatic anesthesia performed by Dr. Messas
Peri-prostatic anesthesia performed on a wider prostate by Dr. Messas
Peri-prostatic anesthesia performed by Dr. Bott
KOELIS Advice
Note that KOELIS Perine Grid™ has some particularities:
- It can’t be offset from the ultrasound plan thanks to the chamfer on the probe (both KOELIS Perine Grid™ 18G and KOELIS Perine Full Grid™ concerned).
- It hasn’t back and front: both sides are printed so it can be reversed: Useful when the user wants to rotate the probe and the patient buttock interfere with the guide screw.
- Locking in 2 steps:
- Open KOELIS Perine Grid™ hinge and position it on the probe (1)
- Close the hinge and fix KOELIS Perine Grid™ in place (2)
Note : don’t move the guide over the protection to keep it in good condition
Find here a user manual reminder.
4. KOELIS Workflow
Beginning of a cartography session
This step marks the beginning of Koelis workflow. As you were using the prostate cartography interface to perform the anesthesia, you just have to check some points before launching the 3D acquisition:
- Make sure the prostate is included in the yellow square. Deepness and focal point can be changed in parameters if necessary.
- Fully lock Steady Pro™ (black screw).
- There must be no air artifacts on the ultrasound image.
The reference ultrasound volume acquisition can be done.
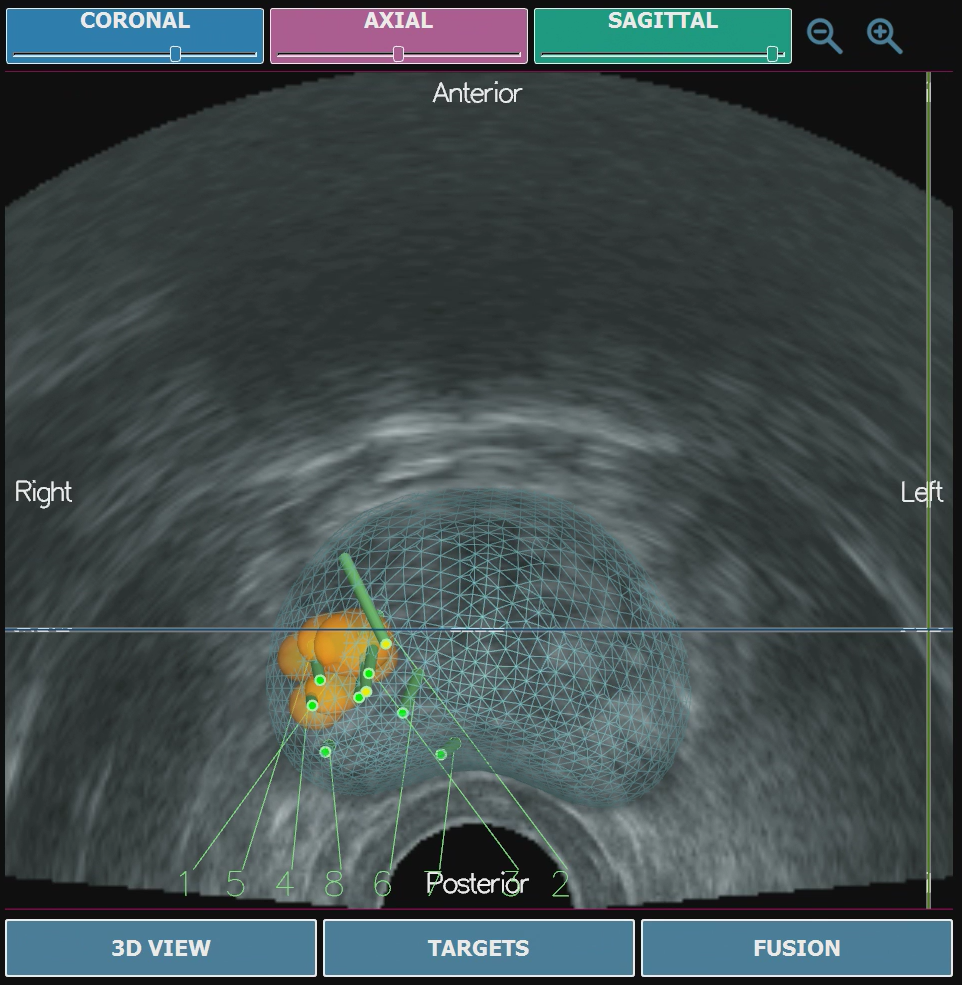
Targeted biopsies
To perform several accurate biopsies in a specific target, you can rotate the biopsy gun (180° against previous biopsy).
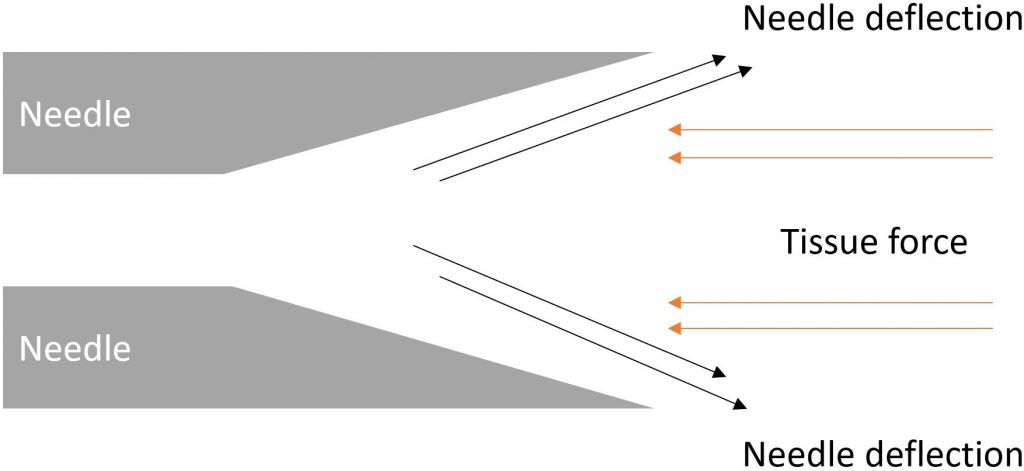
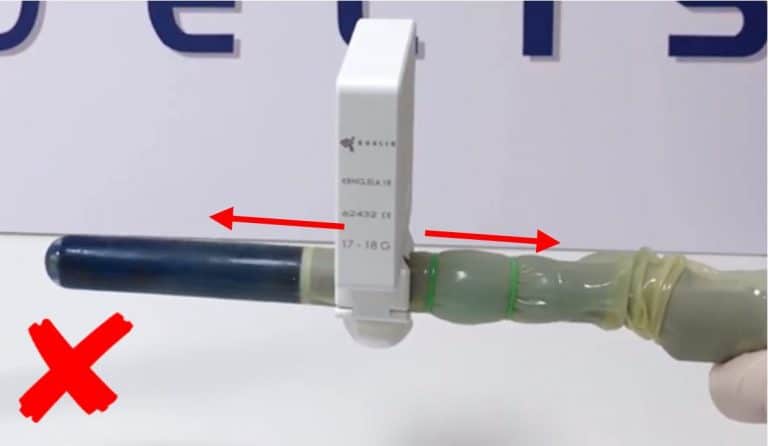
This induces a slight deviation caused by the needle bevel, leading the next biopsy to be just next to the previous one. Basically, with the recommended biopsy gun seen in the material checklist, the needle will deviate toward the trigger button.
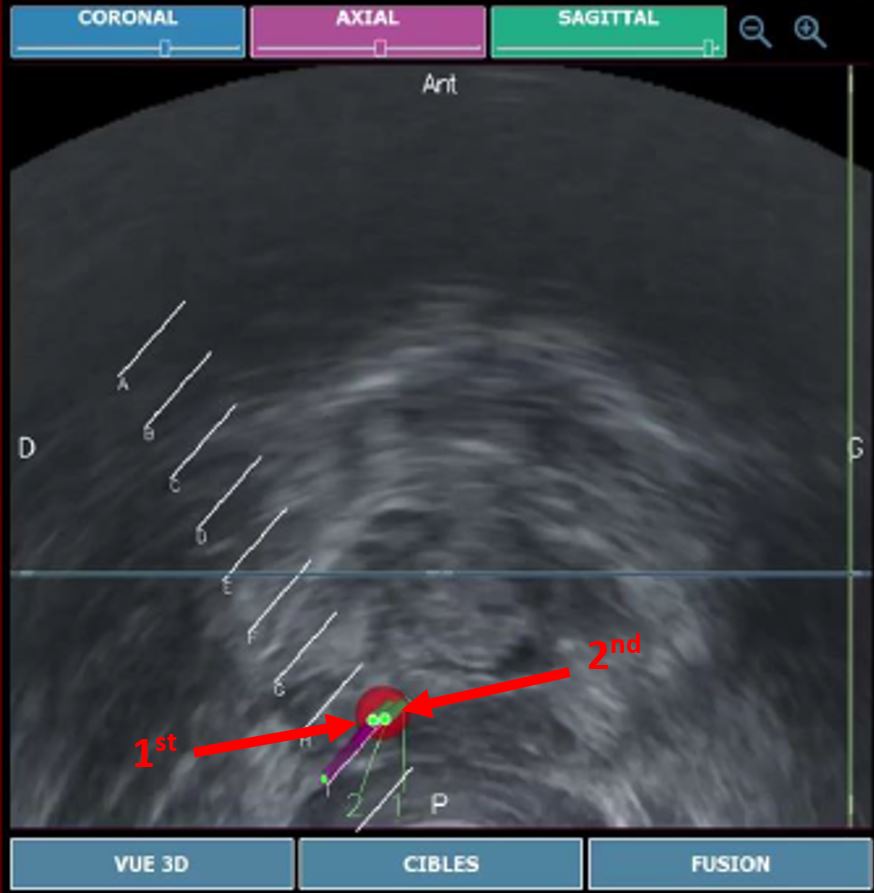
To perform his targeted biopsies, Dr. Bott, from Frimley Park Hospital, use “Single Path” technique :
- A coaxial needle (Bard TruGuide, ref: C1816A) is introduced through perineum muscles.
- All targeted biopsies are done by inserting the biopsy needle inside the coaxial one :
- It reduces the number of punction of the skin during biopsy session.
- It also enhances biopsy precision by reducing needle deviation inside the perineum.
By doing this way, targeted biopsies are distributed from a single point, leaving non-parallel cores in the gland
Dr. Messas performing targeted and framing biopsies
Targeted biopsies performed by Dr. Bott with Single Path technique
Systematic biopsies
Dr. Messas performing systematic biopsies
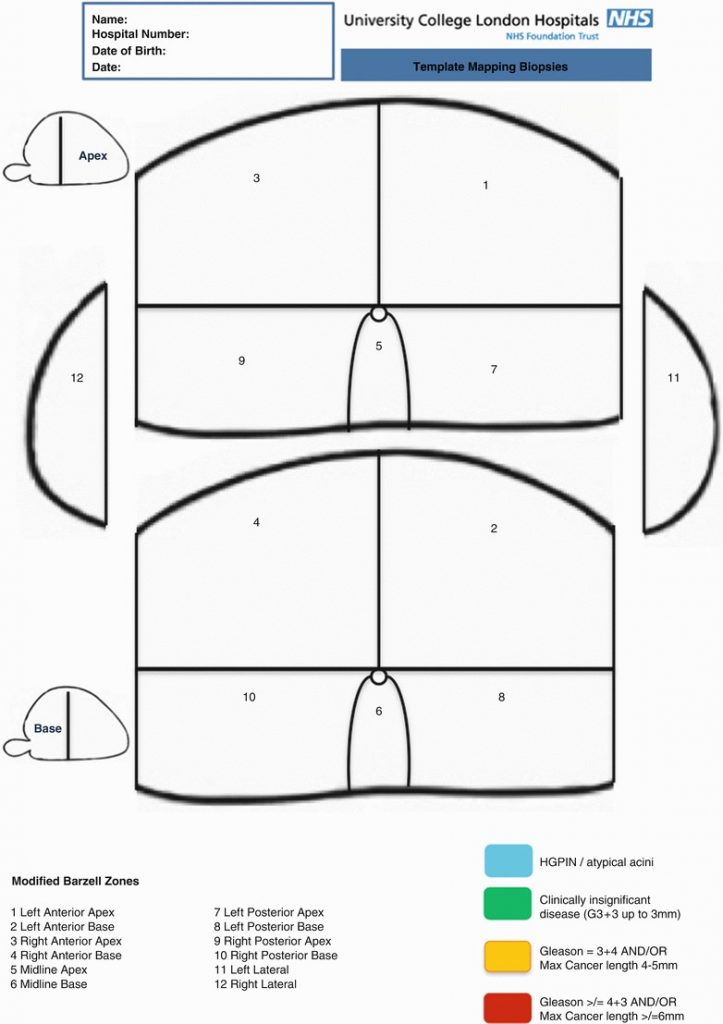
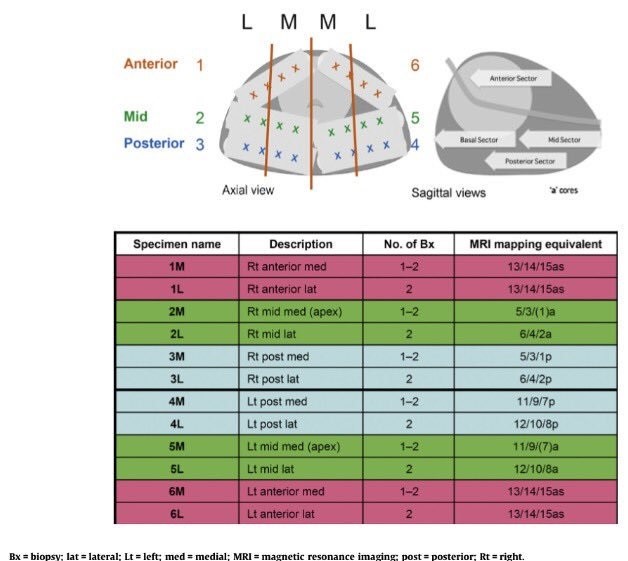
Biopsy cores can be labeled individually according to their X, Y coordinates on the grid and Z coordinates relating to whether it is basal or apical. The alternative is to divide the prostate into zones. There are also several ways to divide the prostate into anatomical zones. For examples, Barzell et al. initially divided the prostate into octants and then further divided them into three zones, yielding 26 separate specimen pots.
The main issue remained that this template saturated the gland with biopsies, that’s why the National Health Service (NHS) introduced the modified Barzell zones where the prostate was segmented into 20 zones. Then later, it was finally reduced into 12 zones only to reduce the resource burden on pathology services. However, transperineal biopsies templates are still under investigation and several templates raise among the scientific community, such as Ginsburg biopsy protocol or template from Michigan Urological Surgery Improvement Collaborative – MUSIC Urology.